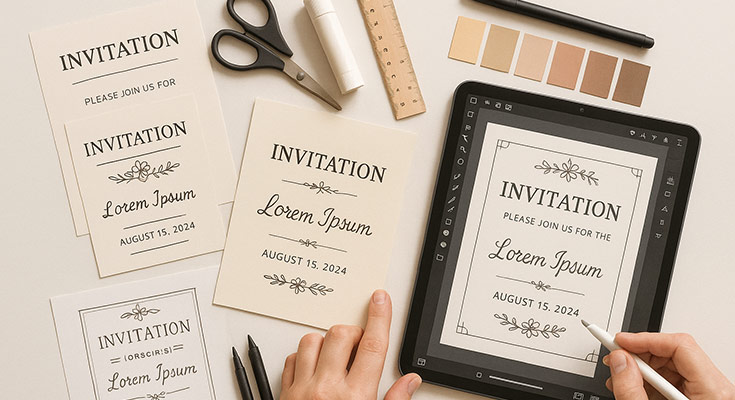
Creating beautiful invitation cards doesn’t require years of design experience or expensive software. If you’re wondering how to make an invitation card that reflects your event’s theme and tone, this comprehensive guide is for you. Whether you’re planning a birthday party, wedding celebration, or corporate event, this comprehensive guide will walk you through every step of the invitation card creation process.
For those who want to get started immediately, you can access our professional invitation card maker online to begin creating stunning invitations right away. By the end of this tutorial, you’ll have the knowledge and confidence to design professional-looking invitations that perfectly capture your event’s spirit.
What Do I Need to Make an Invitation Card?
Before diving into the design process, let’s gather everything you’ll need for successful invitation card creation:
Essential Information Checklist
- Who: Host name(s) and honoree details
- What: Type of event and celebration purpose
- When: Complete date, day of week, and time
- Where: Full venue address with directions if needed
- Why: The Occasion being celebrated
- RSVP: Contact information and response deadline
Required Tools and Materials
- Computer or mobile device with internet access
- Design software or online platform (Canva, Adobe Express, or Microsoft Word)
- High-quality images or photos (if including personal pictures)
- Printer and quality cardstock (for physical invitations)
- Basic contact information for guests
Should I Use Templates or Design from Scratch?
This is one of the most common questions beginners ask, and the answer depends on your experience level and time constraints.
When to Choose Templates
Templates are perfect for beginners because they provide:
- Professional design structure already established
- Proper spacing and layout principles
- Color coordination that works harmoniously
- Typography combinations that are readable and attractive
- Time-saving approach for busy hosts
When to Design from Scratch
Consider custom design if you:
- Have specific brand colors or themes to match
- Want unique invitations
- Have design experience or time to experiment
- Need unusual sizes or formats not available in templates
Pro Tip: Even experienced designers often start with templates as inspiration, then customize extensively to create something unique.
What’s the Standard Invitation Card Size?
Choosing the right size impacts both design and printing costs. Here are the most popular invitation dimensions:
Standard Sizes for Different Events

- 5″ x 7″: Most popular for general events, fits standard envelopes
- 4.25″ x 5.5″: Perfect for casual parties and save-the-dates
- 5″ x 5″: Square format, modern and Instagram-friendly
- 10″ x 14″: Large format for formal events requiring detailed information
Orientation Considerations
- Portrait (vertical): Traditional and formal appearance
- Landscape (horizontal): Modern, allows for wider photo displays
- Square: Contemporary, works well for social media sharing
How Do I Start Making an Invitation Card from Scratch?
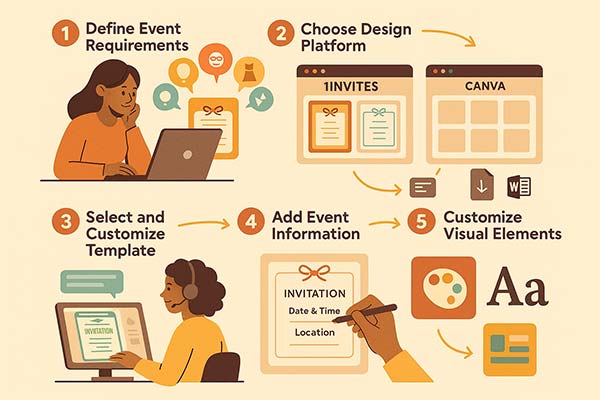
Step 1: Define Your Event Requirements
Start by answering these fundamental questions:
- What type of event are you hosting?
- Who is your target audience?
- What tone do you want to convey (formal, casual, playful, elegant)?
- Do you have any color preferences or theme requirements?
Step 2: Choose Your Design Platform
For beginners, we recommend these user-friendly platforms:
1invites (Best for Invitation-Specific Needs)
- Specialized invitation templates for all occasions
- Pre-designed layouts optimized for invitation content
- Easy customization tools built for event planning
- Professional quality results with minimal effort
- Mobile-responsive designs for digital sharing
Canva (Recommended for Beginners)
- Extensive template library
- Drag-and-drop interface
- Free and premium options available
- Mobile app for on-the-go editing
Microsoft Word
- Familiar interface for most users
- Basic design capabilities
- Good for text-heavy invitations
- Widely accessible
For beginners, we recommend these user-friendly platforms. If budget is a primary concern, our detailed comparison of free invitation maker options highlights platforms that deliver professional results at no cost:
Step 3: Select and Customize Your Template
Once you’ve chosen your platform, follow these template customization steps:
- Browse template categories specific to your event type
- Filter by style, color, and layout preferences
- Preview templates in different sizes
- Select your favorite and begin customization
Step 4: Add Your Event Information
This is where your invitation comes to life. Here’s the proper order for adding information:
Primary Information (Most Prominent)
- Event title or celebration type
- Honoree’s name (for personal celebrations)
- Date and time
Secondary Information (Supporting Details)
- Venue name and address
- Host information
- Special instructions (dress code, parking, etc.)
Tertiary Information (Fine Print)
- RSVP details with deadline
- Contact information
- Additional notes or website links
Step 5: Customize Visual Elements
Color Selection Guidelines
- Choose 2-3 main colors maximum
- Ensure sufficient contrast for readability
- Consider the event’s mood and season
- Test colors on different devices and in print
Typography Best Practices
- Use a maximum of 2-3 font families
- Ensure readability at the actual print size
- Create a hierarchy with font sizes and weights
- Maintain consistency throughout the design
How Do I Add Photos to My Invitation Card?
Personal photos make invitations more engaging and memorable. Here’s how to incorporate them effectively:
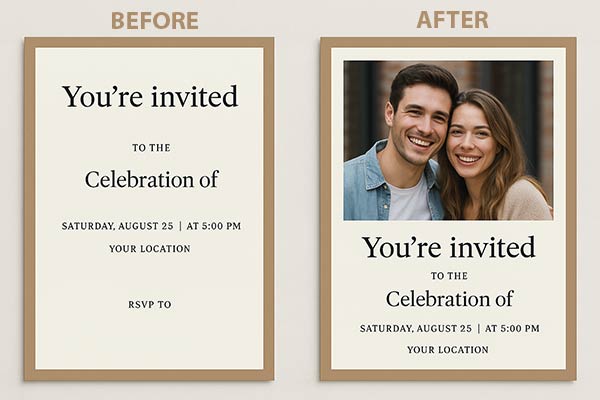
Photo Selection Criteria
- High resolution: Minimum 300 DPI for print quality
- Proper lighting: Clear, well-lit images work best
- Appropriate composition: Consider how the photo will fit your layout
- Relevant content: Photos should relate to the event or honoree
Photo Placement Strategies
- Background element: Subtle, low-opacity photos behind text
- Focal point: Large, prominent photo as the main visual element
- Accent elements: Small photos as decorative border elements
- College style: Multiple photos arranged artistically
Technical Requirements for Photos:
- Format: JPEG or PNG
- Resolution: 300 DPI minimum for printing
- Size: Large enough to maintain quality when resized
- Color mode: RGB for digital, CMYK for professional printing
What Information Must Be Included on Every Invitation Card?
Every effective invitation card must answer six essential questions:
The Six W’s of Invitation Writing
Mastering the Six W’s ensures your invitation is complete, clear, and compelling. These essential details help guests feel informed, welcomed, and prepared.
Who – Host and Honoree Information
- Clear identification of who is hosting
- Name of person being honored (if applicable)
- Contact person for questions
What – Event Description
- Specific type of celebration
- Any special activities or themes
- Dress code or special instructions
When – Complete Date and Time Details
- Full date including day of the week
- Start time (and end time if applicable)
- Time zone if guests are traveling
Where – Venue Information
- Complete address with city and zip code
- Venue name, if applicable
- Parking instructions or directions
Why – Occasion Details
- Reason for celebration
- Milestone being commemorated
- Special significance of the event
How – RSVP and Additional Instructions
- Response method (phone, email, online)
- RSVP deadline
- Number of guests allowed
- Gift preferences or registries
According to UCLA’s Events Office, invitation cards should clearly state the host’s name, type/purpose of the event, date, time, venue, reply instructions (e.g., RSVP card or contact info), directions, and attire recommendations to provide guests with all essential details.1
How Do I Write Different Types of Invitation Messages?
The wording of your invitation sets the tone for your entire event. Here are proven formulas for different occasions:
Birthday Party Invitations
Casual Birthday Format:
You’re Invited!
Join us as [Name] celebrates turning [Age]
[Date] at [Time]
[Location]
RSVP by [Date] to [Contact Info]
Formal Birthday Format:
The pleasure of your company is requested
at a birthday celebration honoring
[Full Name]
[Date] at [Time]
[Venue Name and Address]
Kindly respond by [Date]
For more inspiration and detailed guidance, explore our comprehensive guide on creative birthday invitation design ideas and templates, which covers trending themes and design approaches for all ages.
Wedding Invitations
Traditional Wedding Format:
[Parents’ Names] request the honor of your presence
at the marriage of their daughter/son
[Bride’s Name] to [Groom’s Name]
[Date] at [Time]
[Venue Name and Full Address]
Reception to follow
RSVP by [Date]
Need more wedding invitation wording options? Our detailed guide on wedding invitation wording ideas and examples provides dozens of variations for different wedding styles and cultural traditions.
Corporate Event Invitations
Professional Event Format:
[Company Name] cordially invites you to
[Event Name]
[Date] from [Start Time] to [End Time]
[Venue Name and Address]
[Brief description of event purpose]
Please confirm attendance by [Date]
How Do I Choose the Right Colors and Fonts?
Visual design elements can make or break your invitation’s impact. Here’s how to make professional choices:
Color Psychology for Events
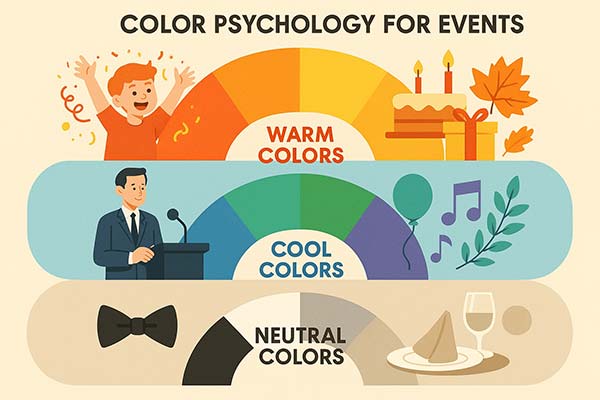
Warm Colors (Red, Orange, Yellow)
- Best for: Energetic celebrations, children’s parties, fall events
- Emotion: Excitement, warmth, joy
- Avoid for: Formal business events, somber occasions
Cool Colors (Blue, Green, Purple)
- Best for: Professional events, calming celebrations, spring/summer themes
- Emotion: Trust, tranquility, sophistication
- Avoid for: High-energy children’s parties
Neutral Colors (Black, White, Gray, Beige)
- Best for: Elegant events, formal occasions, timeless designs
- Emotion: Sophistication, cleanliness, classic appeal
- Avoid for: Overly casual or playful events
Typography Guidelines

Header Fonts (Event Title)
- Choose decorative or script fonts for personality
- Ensure readability at larger sizes
- Test legibility when printed small
Body Text Fonts (Details)
- Select clean, simple, sans-serif, or serif fonts
- Prioritize readability over decoration
- Maintain consistent sizing throughout
Accent Fonts (Special Elements)
- Use sparingly for dates or special phrases
- Should complement, not compete with other fonts
- Consider hand-lettered styles for a personal touch
How Do I Prepare My Invitation for Printing?
Before diving into print preparation, consider whether physical cards are the right choice for your event. Our comprehensive physical invitation card maker guide helps you weigh the benefits of printed invitations against digital alternatives and provides detailed guidance for physical card creation.
File Format Requirements
For Home Printing:
- Save as a high-quality PDF or JPEG
- Resolution: 300 DPI minimum
- Color mode: RGB
- Include bleed area if cutting is required
For Professional Printing:
- PDF with embedded fonts
- CMYK color mode
- 300 DPI resolution
- 0.125″ bleed on all sides
Paper Selection Guide
Cardstock Weights:
- 80lb (216 gsm): Basic quality, budget-friendly
- 100lb (270 gsm): Standard invitation weight, good quality
- 120lb (324 gsm): Premium feel, professional appearance
- 140 lb+ (378 gsm+): Luxury weight, high-end events
Paper Finishes:
- Matte: Elegant, no glare, easy to write on
- Glossy: Vibrant colors, photo-quality appearance
- Linen: Textured, sophisticated feel
- Pearl/Metallic: Luxurious, special occasion appropriate
Printing Checklist
Before final printing, complete this essential checklist:
- [ ] Proofread all text for spelling and grammar
- [ ] Verify all dates, times, and locations
- [ ] Check phone numbers and email addresses
- [ ] Test print one copy to check colors and layout
- [ ] Confirm paper size matches design dimensions
- [ ] Ensure adequate ink/toner levels
- [ ] Plan for 10% extra copies for mistakes or last-minute additions
What Are Common Mistakes to Avoid?
Learning from others’ mistakes can save you time, money, and embarrassment. Here are the most frequent invitation design errors:
Content Mistakes
Missing Critical Information
- Forgetting to include the year in the date
- Omitting the time zone for out-of-town guests
- No RSVP deadline specified
- Missing contact information for questions
Unclear Language
- Using abbreviations that guests might not understand
- Vague venue descriptions
- Confusing time formats (AM/PM clarity)
- Ambiguous dress code instructions
Design Mistakes
Typography Problems
- Using too many different fonts
- The text is too small to read comfortably
- Poor contrast between text and background
- Inconsistent spacing and alignment
Layout Issues
- Overcrowding information
- Poor visual hierarchy
- Unbalanced composition
- Ignoring white space importance
According to Harvard’s HUIT Accessibility guide, key design mistakes include poor text contrast, unreadable font sizes, lack of sufficient line spacing, and missing alt-text or labels—barriers that significantly reduce accessibility for users with visual impairments.2
Technical Mistakes
Print Quality Issues
- Low-resolution images appear pixelated
- Colors look different when printed
- Text cutting off at edges
- Wrong paper size selection
File Management Problems
- Not saving backup copies
- Using fonts not available to the printing service
- Incorrect color mode for printing method
- Missing bleed areas for professional printing
How Do I Send My Finished Invitations?
The delivery method can impact your guests’ perception and response rates.
Physical Invitation Delivery
Mailing Best Practices:
- Use proper postage stamps (metered mail appears less personal)
- Address envelopes by hand when possible
- Include the return address on the envelope
- Mail 4-6 weeks before the event date
- Consider delivery confirmation for important events
Hand Delivery Options:
- Personal delivery shows extra care
- Good for local guests and close relationships
- Allows for immediate questions and conversation
- Ensure the recipient will be available
Digital Invitation Options
Email Invitations:
- Cost-effective for large groups
- Easy to track responses
- Allows for quick updates if details change
- Include a PDF attachment for formal events
Social Media Invitations:
- Great for casual events
- Easy for guests to share with others
- Built-in RSVP tracking
- Less formal but highly convenient
Text Message Invitations:
- Perfect for last-minute events
- High open rates
- Good for younger demographics
- Keep the message brief and include key details
Advanced Tips: Taking Your Invitations to the Next Level
Once you’ve mastered the basics, consider these professional touches. Modern AI-powered invitation makers are revolutionizing the design process by automatically suggesting layouts, color schemes, and even wording based on your event type and preferences.
Design Enhancement Techniques
Layering and Depth:
- Use subtle shadows behind text elements
- Create depth with overlapping design elements
- Implement transparency effects for sophisticated looks
Custom Illustrations:
- Add hand-drawn elements for a personal touch
- Create custom icons related to your event theme
- Use an illustration to reinforce your event’s personality
Interactive Elements for Digital Invitations:
- Animated elements for email invitations
- Clickable maps linking to venue locations
- Embedded RSVP forms for immediate responses
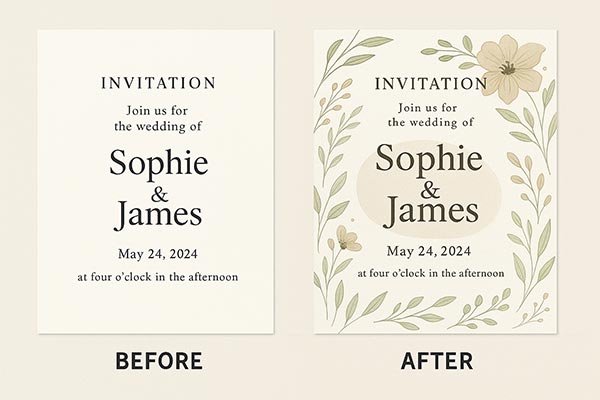
Examples of enhanced invitations showing before/after with professional touches
Professional Finishing Touches
For Print Invitations:
- Consider foil stamping for luxury appeal
- Add embossed elements for a tactile experience
- Use specialty papers like handmade or recycled options
For Digital Invitations:
- Create matching social media graphics
- Design coordinating email signatures
- Develop consistent branding across all event materials
People Also Ask
Absolutely! Modern design tools make it possible for anyone to create professional-looking invitations. Start with templates, use the design principles outlined in this guide, and don’t be afraid to keep it simple. Clean, well-organized invitations often look more professional than overly decorated ones.
The timing for sending invitation cards varies by event. Send casual party invites 2–3 weeks ahead, formal event invites 4–6 weeks before, wedding invitations 6–8 weeks in advance, and for destination events, give guests 8–12 weeks’ notice to plan accordingly.
Including a map or directions on your invitation is a good idea if the venue is hard to find, guests are coming from out of town, parking is limited or requires specific instructions, or if the event is being held at a private residence. Clear directions help ensure a smooth arrival for all attendees.
Every invitation must include the six essential W’s: Who (host and honoree names), What (type of event), When (complete date, day, and time), Where (full venue address), Why (occasion being celebrated), and How (RSVP details with deadline and contact method). Additional elements like dress code, parking instructions, or gift preferences can be included as space allows.
To prepare for printing: Save your design as a high-quality PDF at 300 DPI resolution, use CMYK color mode for professional printing (RGB for home printing), include 0.125″ bleed area if edges will be trimmed, embed all fonts in the PDF, and always test print one copy first to check colors, sizing, and overall appearance before ordering your full quantity.
Conclusion: Your Journey to Perfect Invitation Cards
Creating beautiful invitation cards is a skill that improves with practice. Start with the fundamentals covered in this guide: gather your essential information, choose appropriate tools, select or customize templates thoughtfully, and pay attention to typography and color choices. Remember that the best invitations communicate event details while reflecting the personality of the occasion and hosts.
Your Next Steps:
- Gather your event information using the checklist provided
- Choose your design platform based on your skill level and requirements
- Select a template or start from scratch depending on your time and creativity – if you’re looking for professionally designed options, explore our ready-to-customize invitation templates for every occasion to find the perfect starting point for your event
- Customize your design following the typography and color guidelines
- Proofread everything carefully before printing or sending
- Test your chosen delivery method with a small group first
Remember, invitation cards are often guests’ first impression of your event. Invest the time to make them special, and your guests will appreciate the effort long before they arrive at your celebration.
Reference
- “Review the Basic Elements of an Invitation, Reply Card and Map Insert,” retrieved June 23, 2025. UCLA Events – Plan an Event.
- “Design & Readability,” retrieved June 23, 2025. Digital Accessibility – HUIT, Harvard University Information Technology.