Creating your engagement invitation marks the beginning of one of life’s most exciting chapters. When couples decide to announce their engagement, they want every detail to reflect their unique love story and personal style. Learning how to make engagement invitation designs that truly capture your relationship’s essence isn’t just about saving money; it’s about creating something deeply personal that your guests will treasure long after the celebration ends.
This comprehensive guide will walk you through every aspect of engagement invitation design, from initial planning and material selection to final printing and distribution. You’ll discover professional techniques for creating custom engagement invitations that rival expensive designer options, learn about the best tools and software available, and master the technical aspects that separate amateur attempts from polished, professional-looking results.
Whether you’re planning intimate gatherings or grand celebrations, this guide provides everything needed to create personalized engagement invitations that set the perfect tone for your special announcement. For design inspiration and ready-to-use layouts, explore these beautifully curated engagement invitation templates that can help jumpstart your creative process.
What Are the Essential Steps to Start Making Your Engagement Invitation?
Success in creating engagement cards begins with thorough planning and organization. For detailed fundamentals on how to make an invitation card, this comprehensive approach applies to all invitation types. The foundation of any beautiful invitation lies in understanding your timeline, budget constraints, and design objectives before touching any design software or materials. Knowing how to make engagement invitation plans effective means starting early.
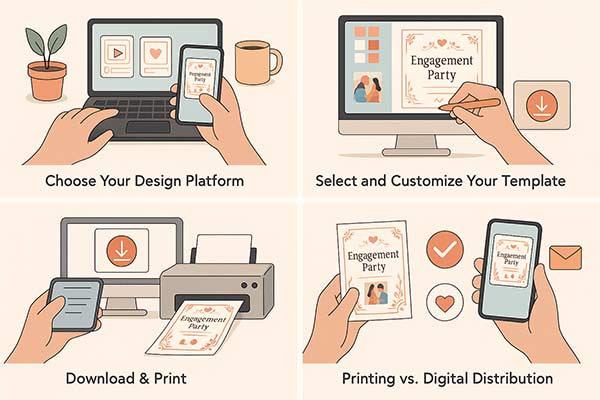
Choose Your Design Platform forms the crucial first step in your invitation creation journey. Research available options based on your skill level and budget constraints. Free platforms like 1Invites, Adobe Express offer user-friendly interfaces with thousands of engagement invitation templates, making them ideal for beginners. Professional software like Photoshop or InDesign provides advanced customization but requires steeper learning curves.
Consider factors like available time, technical expertise, and desired outcome complexity. Mobile apps work well for simple designs, while desktop platforms handle detailed work more efficiently. Evaluate each platform’s template library, customization options, export formats, and pricing before committing to ensure it meets your specific needs.
Select and Customize Your Template involves choosing designs that align with your engagement party’s theme and personalizing them to reflect your unique relationship. Browse template categories filtering by style, color, and formality level to find options matching your vision. Consider your venue, season, and guest demographics when making selections.
Begin customization by replacing placeholder text with your specific event details, ensuring accuracy in dates, times, locations, and RSVP information. For detailed guidance on crafting the perfect invitation text, explore our comprehensive engagement invitation wording guide to ensure your message strikes the right tone. Adjust colors to match your party theme, modify fonts for readability and personality, and add personal photos or graphics that represent your relationship. Test different layout arrangements and design elements until achieving the perfect balance between information clarity and visual appeal.
Download & Print completes the creation process by preparing your design for distribution. Export files in appropriate formats—PDF for printing, PNG for digital sharing, or platform-specific formats for email distribution. Verify all text is legible, colors appear as intended, and layout elements align properly in the final format.
For printed invitations, conduct test prints on similar paper to your final choice, checking color accuracy and print quality. Order adequate cardstock considering your guest count, plus 10-15% extras for mistakes or last-minute additions. For digital distribution, optimize file sizes for email compatibility while maintaining visual quality. Create organized folders storing different format versions and backup copies to prevent loss of work.
Understanding printing vs. digital distribution needs affects both design specifications and budget allocation. Digital invitations offer unlimited revisions, instant delivery, and interactive elements like embedded RSVP forms. For comprehensive guidance on creating digital invitations, explore our digital invitation maker complete guide. Traditional printed invitations provide tangible keepsakes and work better for older relatives who may not be digitally savvy. Many couples choose hybrid approaches, using digital for younger guests and printed versions for family members who prefer traditional formats.
How Do You Choose the Perfect Design Style for Your Engagement Invitation?
Selecting the right design style creates the first impression guests will have. A key aspect of how to make engagement invitation designs effectively is ensuring that visual elements communicate your event’s tone. For additional invitation card design tips and professional techniques, these principles will enhance your overall design approach.
Matching invitation style to engagement party theme requires understanding how visual elements translate into guest expectations. Elegant script fonts and gold foil accents suggest formal affairs requiring dressy attire, while hand-drawn illustrations and bright colors indicate casual, fun celebrations. Review your venue, planned activities, and desired atmosphere to ensure the invitation design accurately represents the actual event experience.
Traditional vs. modern design approaches each offer distinct advantages and aesthetic appeal. Traditional engagement invitation templates typically feature classic elements like elegant typography, formal language, symmetrical layouts, and neutral color palettes. These designs appeal to couples wanting timeless elegance that won’t look dated in the years to come. Modern approaches embrace asymmetrical layouts, bold colors, unique typography, and contemporary graphics that reflect current design trends and personal creativity.
Color palette selection guidelines should consider both aesthetic preferences and practical applications. Colors carry psychological associations—deep blues and greens convey stability and trust, while bright oranges and yellows suggest energy and joy. Ensure sufficient contrast between text and background colors for readability, especially for older guests who may have vision challenges. Consider how colors will reproduce in print versus digital formats, as screen colors often appear more vibrant than printed versions.
Font pairing strategies for readability and elegance require balancing visual interest with functional clarity. Combine no more than two font families—typically one decorative font for names or headlines and one clean, readable font for body text. Ensure script fonts remain legible at smaller sizes and avoid overly ornate options that sacrifice readability for aesthetics. Test font combinations at actual print size to verify clarity and visual appeal.
Learn more: Engagement Party Invitations Design Ideas and Tips
How Can You Create Stunning Visual Elements for Your Invitation?
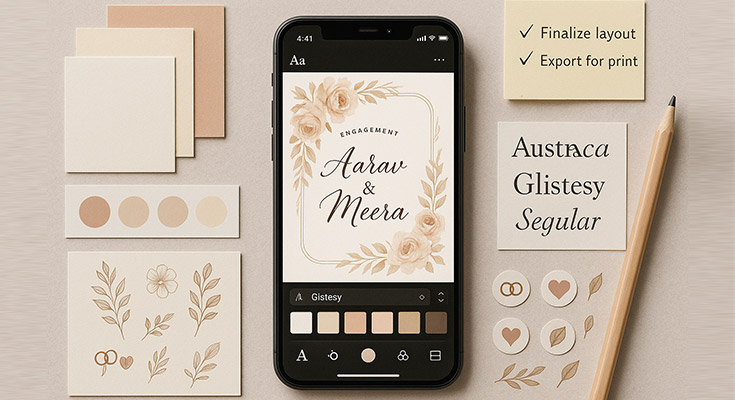
Understanding how to make engagement invitation layouts visually striking involves balancing style and function. Explore the newest engagement invitation trends for fresh inspiration on visual elements and design approaches that are currently popular. Use high-resolution couple photos, personalized icons like rings or flowers, and well-designed borders that frame your content without overwhelming it.

Selecting and editing photos of the couple requires attention to image quality, composition, and overall design integration. Choose high-resolution photos (minimum 300 DPI for print) with good lighting and clear facial features. Consider the photo’s mood and how it aligns with your event’s tone—formal portraits work well for elegant affairs, while candid shots suit casual celebrations. Edit photos to match your color palette, adjusting saturation, contrast, and brightness as needed. Create consistent styling across multiple photos if using several images.
Creating decorative borders and frames adds visual interest without overwhelming the core content. Hand-drawn elements like floral borders, geometric patterns, or simple line work can be created using design software or drawn traditionally and scanned. Digital brushes and pre-made elements offer quick solutions, but custom artwork ensures uniqueness. Maintain consistent line weights and styling throughout all decorative elements to create a cohesive visual appeal.
Incorporating engagement ring or wedding-related graphics should enhance rather than dominate the design. Subtle icons like rings, hearts, or floral motifs work well as accent elements or dividers between text sections. Avoid clichéd clip art in favor of custom illustrations or high-quality graphics that match your overall aesthetic. Consider cultural symbols or personal interests that make the design more meaningful and unique to your relationship.
Using whitespace effectively for clean design prevents overcrowded, difficult-to-read invitations. Whitespace—areas without text or graphics—gives the eye places to rest and helps organize information hierarchically. Group related information together with adequate spacing between different sections. Resist the urge to fill every available space with decorative elements; clean, uncluttered designs often appear more professional and elegant.
Adding texture and pattern elements creates visual depth and tactile interest. Digital textures like watercolor washes, linen patterns, or subtle gradients add sophistication without requiring special printing techniques. For physical invitations, consider textured cardstock, embossing, or layering different paper types. Ensure texture elements don’t interfere with text readability and maintain consistency with your overall design theme.
What Are the Best Tools and Software for DIY Engagement Invitations?
Choosing the right design tools significantly impacts both the creation process and final results. The best platform depends on your experience level, budget, and desired outcome complexity, with options ranging from beginner-friendly apps to professional-grade software.
Free online design platforms (1Invites, Adobe Express) offer excellent starting points for beginners. 1Invites provides thousands of engagement invitation templates with drag-and-drop customization, making professional-looking designs accessible to users without design experience. Adobe Express offers similar functionality with additional integration to other Adobe products. Both platforms include stock photos, fonts, and graphics, though premium elements require paid subscriptions. These platforms excel at speed and convenience but may limit advanced customization options.
Professional software options (Photoshop, InDesign) provide unlimited creative control for users comfortable with more complex interfaces. Adobe Photoshop excels at photo editing and graphic creation, while InDesign specializes in layout design and typography. These programs offer precise control over every design element, advanced printing options, and professional-quality output. However, they require steeper learning curves and monthly subscription fees, making them better suited for users planning multiple design projects.
Mobile apps for on-the-go editing enable creation and revision anywhere inspiration strikes. Apps like Over, Unfold, and Canva’s mobile version provide surprisingly robust design capabilities on smartphones and tablets. Mobile creation works particularly well for social media-focused digital invitations or quick concept development. However, detailed work and fine typography adjustments remain easier on larger screens with precise input devices.
Template resources and where to find them extend beyond basic platform offerings. Sites like 1Invites, Etsy, and Creative Market offer professionally designed templates for purchase or download. Free resources include Pinterest inspiration boards, design blogs, and template-sharing communities. When using templates, ensure licensing allows your intended use and customize sufficiently to avoid identical designs appearing at multiple events.
Printing software considerations become crucial when producing physical invitations. Ensure your chosen design software exports to print-friendly formats (PDF with embedded fonts and proper color profiles). Consider software that handles multiple copies, envelope addressing, and batch processing for efficiency. Some platforms offer integrated printing services, streamlining the process from design to delivery.
How Do You Master the Technical Setup for Creating Invitations?
Technical proficiency separates amateur-looking invitations from professional-quality results. Understanding proper setup ensures your designs print correctly, display beautifully across devices, and maintain quality throughout the creation and distribution process.
Setting up proper document dimensions and resolution forms the foundation of quality output. Standard invitation sizes include 5″x7″ for elegant, traditional looks, 4.25″x5.5″ for cost-effective mailing, and custom sizes for unique presentations. Always design at actual size rather than scaling up or down, which can degrade quality. Set resolution to 300 DPI for print projects and 72 DPI for digital-only invitations. Higher resolutions provide better quality but create larger file sizes that may be difficult to share or email.
Understanding color modes (RGB vs CMYK) for different outputs prevents disappointing color discrepancies between screen and print. RGB (Red, Green, Blue) represents colors using light, making it ideal for digital displays but unsuitable for printing. CMYK (Cyan, Magenta, Yellow, Black) represents printed colors using ink, ensuring accurate reproduction on paper. Design digital invitations in RGB mode and convert print projects to CMYK early in the process to identify potential color shifts.
Creating bleed areas and safe zones for printing accommodates imperfect cutting during professional printing. Bleed areas extend design elements 0.125″ beyond the final trim size, ensuring no white edges appear if cutting is slightly off. Safe zones keep important text and graphics at least 0.25″ inside the trim area, preventing accidental removal during cutting. These specifications seem technical, but are essential for professional results when using commercial printing services.
File format selection for various distribution methods affects quality, file size, and compatibility. PDF files preserve formatting across different devices and operating systems, making them ideal for printing and professional sharing. PNG files maintain transparency and work well for digital sharing, but create larger file sizes. JPEG files compress efficiently for email distribution but don’t support transparency and may degrade with repeated editing.
Quality control and proofing techniques catch errors before final production. Print test copies on home printers using similar paper to your final choice, checking for color accuracy, text clarity, and overall appearance. Review digital versions on different devices and email platforms to ensure consistent display. Create checklists covering spelling, dates, addresses, and contact information. Have multiple people review final designs, as fresh eyes often catch overlooked mistakes.
What Are the Most Effective Printing and Distribution Methods?
The final step in creating custom engagement invitations involves choosing distribution methods that balance quality, cost, and convenience while ensuring your invitations reach guests in perfect condition and on time.
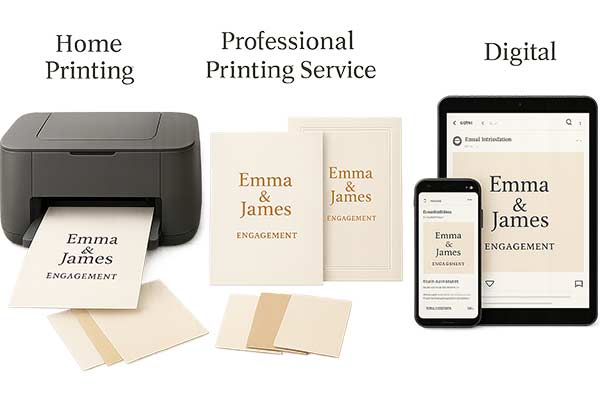
Home printing setup and paper selection offer maximum control over timing and costs. High-quality inkjet printers produce excellent results on appropriate cardstock, though laser printers may handle heavier papers better. Choose cardstock between 110-130 GSM for durability without excessive bulk. Specialty papers like linen, laid, or recycled options add texture and visual interest. Test print single copies before committing to full runs, and purchase 10-15% extra paper to accommodate printing errors or last-minute guest additions.
According to the SAIC Service Bureau, home or student print setups should distinguish between text weight (lighter, like letterhead quality) and cover/cardstock weight (heavier, similar to business cards or invitations). They note that most Risograph-style devices reliably handle text weights from 20 lb/ 50 # up to 80 lb cover—information that helps when selecting compatible paper for DIY invitations.1
Professional printing services comparison provides superior quality and finish options, but requires advanced planning and higher costs. Local print shops offer personalized service and quick turnaround but may have limited specialty options. Online services like Vistaprint, Moo, or FedEx Office provide competitive pricing and professional finishes like foil stamping, embossing, or specialty inks. Compare costs, including shipping, and order samples before committing to large quantities to verify quality and color accuracy.
Digital distribution via email and social media offers immediate delivery, cost savings, and interactive capabilities. Email invitations can include RSVP links, venue maps, and additional information without increasing costs. Discover the best online RSVP invitation maker apps to streamline your response collection process. Social media distribution works well for casual events and younger guest lists, but may miss older relatives who aren’t digitally active. Create mobile-friendly designs that display well on smartphones and tablets, and include clear subject lines that won’t trigger spam filters.
A hybrid approach: combining print and digital accommodates different guest preferences and communication styles. Send printed invitations to older relatives and VIP guests while using digital versions for younger friends and colleagues. Maintain a consistent design across both formats while optimizing each for its distribution method. This approach maximizes reach while controlling costs and ensuring all guests receive invitations in their preferred format.
Cost analysis for different distribution methods helps optimize budget allocation. Calculate total costs, including materials, printing, postage, and time investment for accurate comparisons. Digital invitations eliminate printing and postage costs but may require paid platform subscriptions for advanced features. Professional printing services charge premium prices but save time and ensure consistent quality. Factor in your available time and skill level when evaluating the true costs of different approaches.
How Can You Personalize Your Engagement Invitation to Stand Out?
Personalization transforms generic templates into meaningful keepsakes that reflect your unique relationship and create excitement for your celebration. The most memorable invitations tell your story while providing essential event information.
Adding unique couple details and inside jokes creates intimate connections with your guests while showcasing your relationship’s personality. Include subtle references to how you met, shared hobbies, or memorable moments that close friends and family will recognize and appreciate. Consider incorporating nicknames, favorite quotes, or references to special places in your relationship. Balance personal touches with broader appeal, ensuring all guests feel included rather than excluded by overly specific references.
Incorporating engagement story elements helps guests understand your journey and builds excitement for your celebration. Brief mentions of your proposal location, the season you got engaged, or elements that made the moment special can inspire design choices and color palettes. Use these details subtly through graphics, colors, or decorative elements rather than lengthy narrative text that might overwhelm the invitation’s primary purpose.
Custom illustration and hand-lettering options create truly one-of-a-kind designs that no template can replicate. Commission artists to create custom portraits, venue illustrations, or decorative elements that reflect your style. Hand-lettering adds organic warmth that digital fonts can’t match, though it requires significant time investment or professional services. Even simple hand-drawn elements like borders or small graphics can add personal touches that make invitations feel special and handcrafted.
Interactive elements for digital invitations engage recipients and provide enhanced functionality beyond traditional paper formats. Embed RSVP forms, links to wedding websites, photo galleries, or countdown timers that build anticipation. Animation and video elements can showcase your engagement photos or tell your story dynamically. Ensure interactive elements enhance rather than complicate the user experience, and always provide alternative ways to access essential information for guests using older devices or software.
Matching invitation suite creation extends your design across multiple pieces for cohesive branding throughout your engagement and wedding journey. Create consistent elements across save-the-dates, invitations, RSVP cards, thank-you notes, and wedding invitations. Explore our wedding invitation designs to maintain design consistency throughout your entire celebration journey. Develop a style guide including color palettes, fonts, and graphic elements that can be adapted across different formats while maintaining visual consistency. This approach creates professional-looking suites that rival expensive designer packages.
People Also Ask
How much does it cost to make DIY engagement invitations?
DIY engagement invitations typically cost $50-200 for 100 pieces. Basic designs with home printing cost $0.50-1.00 per invitation, while premium options with specialty papers range from $1.50-2.00 each. This saves significantly compared to professional services charging $3-8 per invitation.
What software is best for making engagement invitations at home?
Canva offers the best beginner-friendly experience with templates and drag-and-drop editing. Adobe Photoshop and InDesign work well for advanced users. Free alternatives include GIMP and Canva’s free tier. Choose based on your experience level and design needs.
How far in advance should I make and send engagement invitations?
Start creating invitations 4-6 weeks before your party. Send them 2-3 weeks before the event for adequate RSVP time. Digital invitations can be sent 1-2 weeks in advance due to instant delivery.
Can I create digital engagement invitations instead of printed ones?
Yes, digital invitations offer cost savings, instant delivery, and interactive features like RSVP forms and maps. They work well for casual events and younger guests, though older relatives may prefer printed versions. Consider a hybrid approach for different guest preferences.
What paper type works best for DIY engagement invitations?
Cardstock between 110-130 GSM provides the best balance of quality and home printer compatibility. Matte finishes work well with most printers, while specialty papers like linen add elegant texture. Always test samples before ordering full quantities.
How do I ensure my DIY engagement invitation looks professional?
Maintain consistent spacing and alignment using grids. Use high-quality images (300+ DPI) and limit fonts to a maximum. Ensure good contrast between text and background. Always print test copies and have others proofread before final production.
What common mistakes should I avoid when making engagement invitations?
Avoid overcrowding information, using too many fonts, and poor image resolution. Ensure sufficient text contrast, double-check spelling and event details, and don’t rush the timeline. Proper proofreading prevents embarrassing errors.
Can I make engagement invitations using my smartphone?
Yes, apps like Canva, Over, and Adobe Express offer professional templates for mobile creation. They work well for digital invitations and simple designs, though complex layouts are easier on desktop computers.
How do I choose the right size for my engagement invitation?
Standard 5″x 7″ works well for formal events with detailed information. 4.25″x5.5″ reduces costs while providing adequate space. Consider your information volume, mailing costs, and printer capabilities when choosing size.
What’s the difference between engagement party and wedding invitations?
Engagement invitations are more casual and celebratory with relaxed language and brighter colors. Wedding invitations require formal language, complete ceremony details, and stricter etiquette. Engagement invitations can be sent with shorter notice and allow more creative freedom. Check out these engagement party invitations & wedding invitation templates that showcase the perfect balance of festive and elegant design.
Frequently Asked Questions
The complete process typically takes 10-15 hours spread over 1-2 weeks, including initial planning, design development, revisions, printing, and assembly. Digital-only invitations reduce time to 6-8 hours by eliminating printing and physical assembly steps.
Use natural lighting during golden hour (early morning or late afternoon), take multiple shots from different angles, and edit using apps like VSCO or Lightroom. Focus on clear facial features, good composition, and images that match your event’s tone.
Generally, avoid registry details on the main invitation. Instead, include this information on separate inserts, your wedding website, or share through word-of-mouth to maintain invitation elegance and focus on the celebration rather than gifts.
Use high contrast color combinations, minimum 12-point fonts, avoid red/green color combinations for colorblind guests, and provide digital versions compatible with screen readers. Consider large-print versions for guests with vision impairments.
Use formal titles and full names, hand-address envelopes when possible, double-check spelling of all guest names, and include return addresses. For couples, traditionally, address both parties unless only one is known to you personally.
Yes, maintaining consistent design elements across your invitation suite creates professional, cohesive branding. Adapt core elements like color palettes, fonts, and graphics while adjusting layouts for each piece’s specific function and information requirements.
Create simple spreadsheets, use online RSVP tools like Google Forms, or include traditional RSVP cards with pre-addressed return envelopes. Digital tools offer automatic organization and follow-up capabilities – discover how to track RSVP responses online for seamless event management.
For minor errors, use elegant correction stickers or handwrite corrections in matching ink. For major mistakes affecting readability or essential information, consider reprinting affected portions or embracing the error as part of your unique story.
Research traditional colors, symbols, patterns, and typography from your cultural backgrounds. Integrate elements respectfully and meaningfully, perhaps using traditional motifs as decorative borders or incorporating ceremonial colors into your palette while maintaining overall design cohesion.
Save high-resolution files in multiple formats (PDF, PNG, original design files), store on cloud services like Google Drive or Dropbox, keep physical samples in acid-free sleeves, and document color codes and font choices for future reference in wedding planning.
Conclusion
Understanding how to make engagement invitation designs that are both stunning and meaningful transforms your planning process into a creative celebration. This guide equips you with tools, ideas, and templates to craft invitations that not only look professional but also express your love story in a truly personal way.
The journey from initial concept to final distribution teaches valuable skills applicable to future wedding planning and life projects. The confidence gained from completing custom engagement invitations often inspires couples to tackle other DIY wedding elements, such as how to make wedding invitations, creating cohesive celebrations that truly reflect their personalities and values.
Ready to create your perfect engagement invitation? Begin with clear planning, choose tools matching your skill level, and remember that personal touches matter more than professional perfection. Your guests will appreciate the thought and effort invested in creating something uniquely yours, regardless of technical sophistication.
Start your creative journey today by exploring invitation templates, gathering inspiration, and setting up your design workspace. The perfect invitation awaits your personal touch and creative vision.
Reference
- “Paper Weights & Types,” Retrieved July 7, 2025. Service Bureau – SAIC.